Recipes, Uncategorized

Chicken Alfredo Mac and Cheese for a Crowd

This meal uses simple and inexpensive ingredients. I spent less than $1 per person. The process is pretty easy too.

This recipe makes enough to feed 100 people, and it is easy to adjust to the size of your crowd. It tastes better the next day, too, and everyone loves it. That makes it one of my favorite meals.

Here are the ingredients you will need:

How to make the chicken:

I used 2 large aluminum, full-sized steam pans (20.75″ x 12.81″ x 3.8″). I buy them at Sam’s club in bulk. They are very sturdy and are the best price I have found.

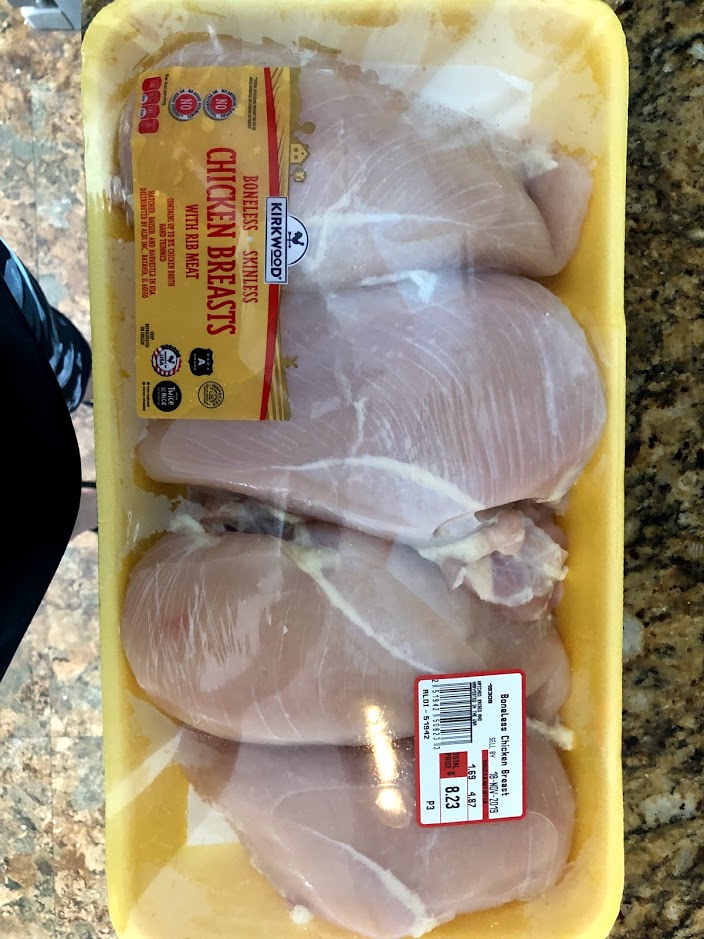
I bought chicken at Aldi for less than $2 a pound. I bought three packages, each roughly 10 pounds.

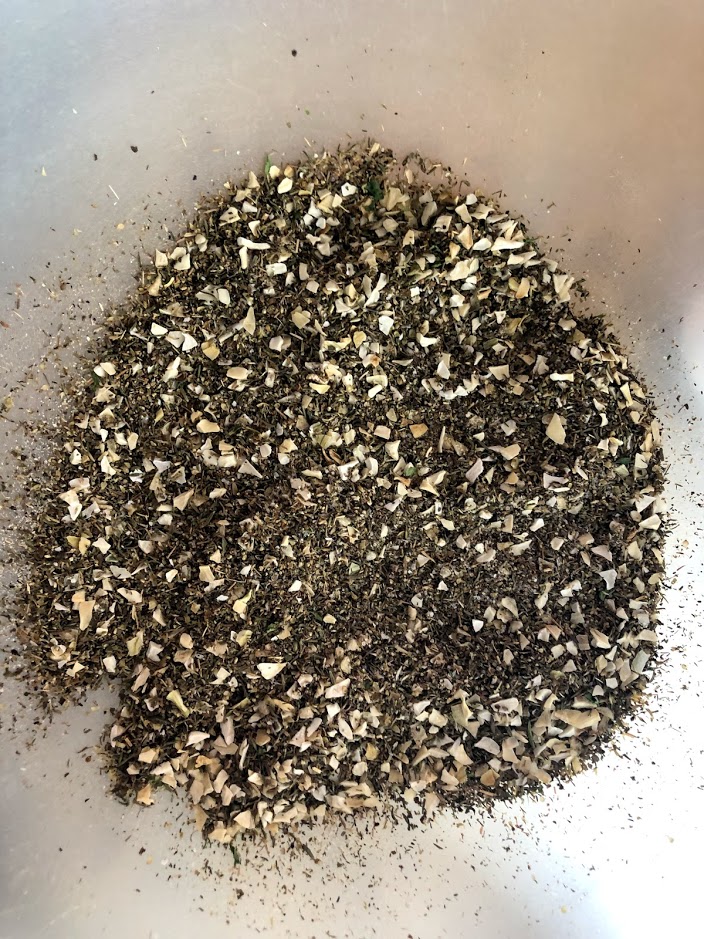
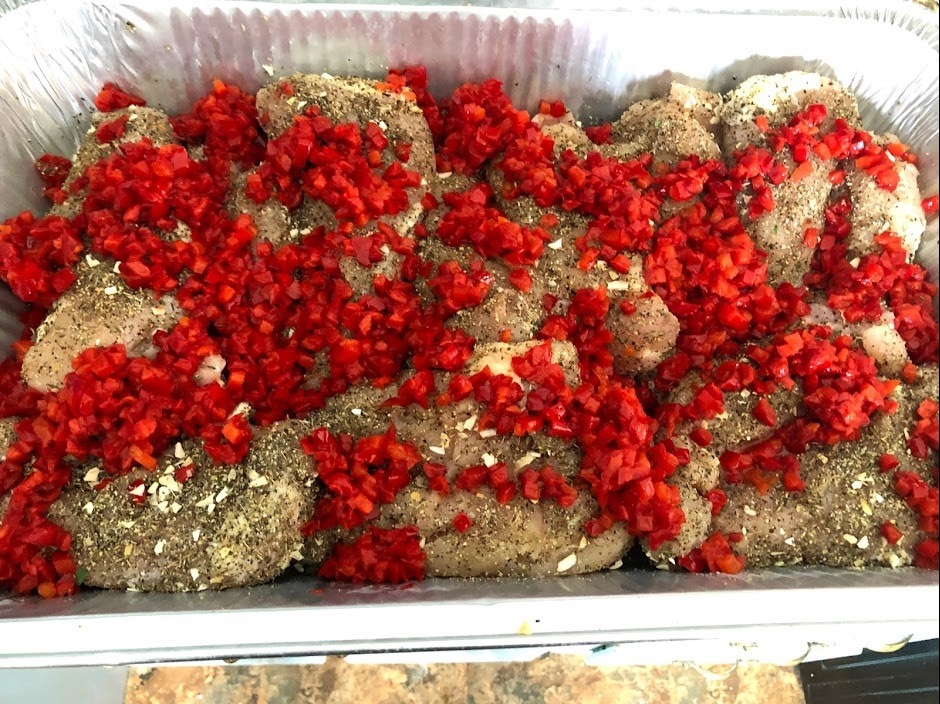
Your herbs are going to coat the chicken. So I mix them in a bowl. Then I cover the chicken entirely on both sides. These seasonings are where all the flavor comes from, so don’t skimp on the coating.

Add one can of roasted peppers to each pan. I just sprinkled mine right over the top of the chicken.

Cook the chicken in a 400-degree oven for about 40-50 minutes, until the meat thermometer reads 160. You want the oven to be sweltering. Cooking meat at high temperatures locks the juices in and keeps your meat very tender and juicy. You also do not want to overcook your chicken. Be sure to get a meat thermometer if you don’t have one. They are essential cooking tools. You don’t want to do all this work just to have a chicken that tastes like you’re eating a shoe.

While the chicken is cooking, you can cook the macaroni noodles. I have a large stockpot that I use for both the noodles and the sauce we will make last.

When the chicken cools, you want to cut it into strips or chunks.

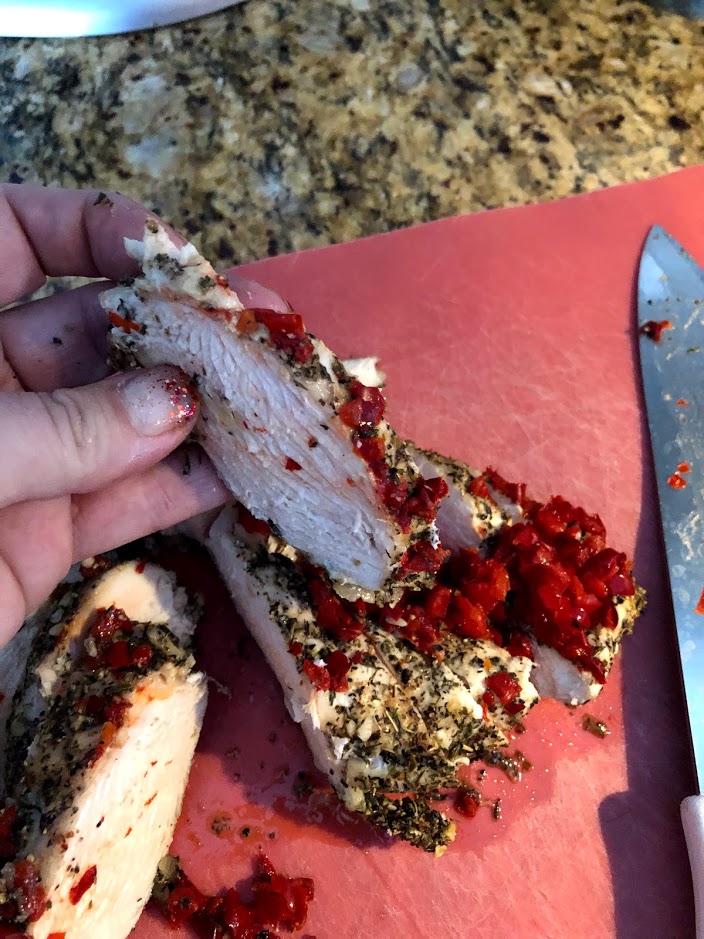
I slice the chicken and put it right back into those beautiful juices. Those juices will make this dish stay creamy throughout the process, as well as keeping that tremendous flavor that those herbs put out.

Now you add the cooked noodles and uncooked spinach. The spinach will cook with the hot sauce and when you reheat this to serve it.

How to make the sauce:

For this recipe, we will ditch the béchamel and make our sauce with 3 simple ingredients- cream cheese, milk, and grated parmesan and romano cheeses. I used the canned kind, but the best is to use fresh. Sam’s club sells this fantastic cheese that has large shredded pieces of asiago, romano, and parmesan mixed. It’s really worth the extra money, in my opinion. But going to Sam’s is not always easy for me, and it’s still really delicious without it. I got no complaints from those that ate this meal. Everyone wanted the recipe.

So in the same large pot that I cooked my noodles, I put all the cream cheese and all the milk. I cooked it down until all the cream cheese melted. Watch it closely, so it doesn’t burn. The milk burns easily. Once the mixture is smooth, I removed it from the heat and added all the parmesan/romano cheese. When making cheese sauces, it’s best to not add the cheese to the pan while it’s on the heat. It will scorch immediately. Blocked cheese like cream cheese and Velveeta are different and can withstand the heat. Just keep your eye on them.

Then I put my pot in between the two pans of mixed chicken ingredients. I added the sauce about 5-6 large spoonfuls at a time. You want it to be distributed evenly. I added, then stirred, then added, then stirred, then added, then stirred…

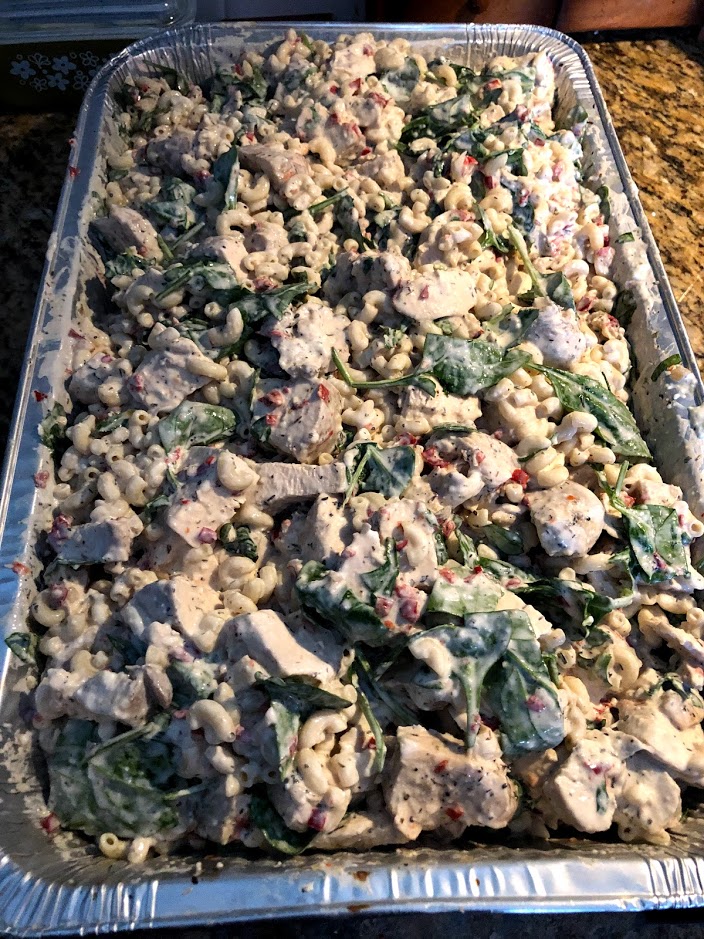
The finished dish looks and tastes so amazing. Everyone will want to know how you did it.

If you are serving it that day or the next, you want to cook it until it’s bubbly. Mine was cold when I put it in the oven, so it cooked about 40 minutes, and I stirred it pretty often.

Enjoy!

Recipes

Inexpensive Pumpkin cake For 100 people

Today I made a cake for 100 people. The whole cake costs $15. That is not true. It cost me about $5 to make it because I get free eggs, thanks to my chickens, and free pumpkin thanks to donations from our supporters. This cake is something I often make and with many variations. I guess you would call it my go-to cake.

I bought this creamer, so I thought. Sometimes I’m in such a hurry I miss the fine print.

I was walking around with coffee, working, and yelling at Aldi for their horrible creamer. I was upset that it was so bland, had no cream, and not what I like in a well-flavored creamer.

Then I read the bottle only after it sat in the fridge for a long time.

I was cleaning out my fridge to cook things up that I don’t want to get spoiled. Then I looked at that creamer and read the front.

Yep. It’s all Aldi’s fault.

I am losing my mind a little. Maybe. Because this is a pumpkin spice latte, not a pumpkin-spice-latte flavored creamer — much different taste.

In my kitchen, we don’t throw things away. So the Pumpkin Spice latte glaze was born.

Pumpkin is free to me regardless. I prefer to grow butternut squash in place of pumpkin. It tastes just like pumpkin but has no liquid in it. In fact, many times, canned pumpkin is made out of butternut squash. Manufacturers are much like me, and they do not like waste. They are always concerned with the bottom dollar. Butternut squash goes a lot further than pumpkin- earning its place as my favorite.

To make the cake:

You make this basic cake with three boxes of white or yellow cake mix. You follow the instructions on the box and omit half the water by replacing it with three cans of pumpkin. You also need to add about 1/8 of a cup of pumpkin spice seasoning. It’s a lot because the cake is large.

I buy these full-size steam table pans from Sam’s Club. If you shop online, you can get 18 pans for only $10. These are great pans because they are sturdy and don’t buckle easily under the weight. I know that its a luxury to buy throw away pans but I feed 100 people every week. Sometimes it’s okay to have some help. Just make sure you do it so it’s inexpensive and good quality. Inexpensive doesn’t mean it should not work. Then the savings is not worth it.

To make the glaze:

You make the glaze with a pound of powdered sugar and a cup of the latte. If you don’t have the latte, you can use coffee that is very diluted with milk and pumpkin spice seasoning. You mix it up cold and add it to the cake when it first comes out of the oven. Super simple. You want to make sure you put the glaze on a little at a time. It took me about five dumps for it to do its job. You want it to soak into the middle of the cake as well as the side. So you add it directly to the center of the cake, let it sit for about 3-5 mins, then add a little more. It oozes down the sides of the cake more than the center. That is why you need to make sure you hit the middle first and let it soak in during the intervals. Otherwise, the glaze will only be on the sides of the cake.

When the cake cools, it will have a beautiful glaze. You can sprinkle the top with more of the pumpkin spice.

The real beauty of this cake is that it tastes better the next day after it has been refrigerated. The taste is good the same day, but it’s even better the next. It makes a great addition to a breakfast buffet. You can use it in a lot of ways.

Other variations I’ve used to the pumpkin cake is to melt cream cheese and drizzle it over the cake batter before baking it. You swirl it around, so it looks marbled. That is an excellent rendition of the pumpkin cake.

I’ve also made it with a crumb topping. You can add white chocolate chips to the top while it’s still hot, and they make a chocolate glaze.

I’ve made it with a pecan crumb topping.

I’ve used melted butter with cinnamon and sugar as a glaze.

The old-fashioned cream cheese frosting is a good one. The kind you put in pumpkin rolls. It is a little more expensive, but not that much.

Official instructions:

Preheat the oven to 350

Mix the all the ingredients except the powdered sugar and latte with a whisk. Pour the batter into a large aluminum pan sprayed with non-stick spray. Bake uncovered about 60 minutes in a 350-degree oven until the middle springs bake when you press on it.

Mix the powdered sugar and latte with a whisk and dump onto the hot cake in 5-minute intervals.

Let cool and serve.

Recipes

End of Week Pasta Salad

Alright, by now we all know that I love to save money. I don’t like to waste, and I attempt to be healthy by not eating too much processed foods, or eat out where they have control over my food.

This pasta salad is one of those meals that I whip up, very often, in order to use up produce and cheese, that have been in my refrigerator for the week.

I am on a stupid diet right now so I am using ingredients that are heart healthy, like whole grains and olive oil. You can use anything you want in your pasta salad. That is the beauty of this pasta salad. I have literally made it without any vegetables, without any cheese, or without any extras like olives and such.

The point is to use what you have and make a delicious dressing to go on it. That’s the secret to a good pasta salad, every time. Not the ingredients, although certain ingredients are perfect in pasta salad, but the overall taste of the salad, aka… the dressing.

Here are some pictures of the ingredients I used.


As you can see I cooked a 1/2 pound of whole grain pasta, just a little because I can only have a couple cups a day, and whatever vegetables were left from the week. Use more noodles if that’s what you have most of. This pasta salad gets eaten very quickly so this a great way to use up those peppers that are starting to show signs of over-ripening. Also, those tomatoes, I didn’t have many. I cut them in half.  The rest of my ingredients came from a can, olives and pickled garlic. I had small blocks of cheese, several kinds, so I cut them small to incorporate all through my salad.

So, for that dressing I bragged about.

You will need:

1 cup of olive oil (I used extra virgin for the health properties)

1/2 cup white wine vinegar

1 tablespoon of oregano and 1 tablespoon of tyhme

I would normally use some garlic salt as well but I put pickled garlic in my salad and omitted it this time.

Salt and pepper to taste

You want a lot of dressing. You want the dressing to sit at the bottom of the bowl when it first goes in. So, if you are making a bigger salad than me, be sure to really make lots of dressing. The noodles soak it up as it sits in the fridge.

Whisk together all the ingredients.  Dump them on your pasta salad and mix well.

Let your salad sit in the fridge for an hour, covered, then take it out to taste it. I really encourage this part. The salad tastes so different after it sets.  The herbs and spices have more time to soften and marinate together. Also, after it sits, the noodles soak up that dressing and you want to make sure you don’t need to add more. If you let it sit too long without enough dressing, the flavors do not get into the noodles properly.

KIMG0446.jpg
Great little snack. Healthy and delicious.

Whatever doesn’t get eaten on the weekend, gets used for lunches on Mondays. I like to save sour cream containers for the kids, school lunches. I save them, then pack up this salad in their throw away containers, and put them in the fridge. They can grab them and go on Monday mornings.


Recipes

Alice’s Homemade Noodles

My Grandma Alice. Boy do I miss her.  She’s a legend in our family.  She was so sweet unless you made her mad, then look out. My generation grew up loving her profoundly and fearing her immensely.scans 072

Grandma Alice raised 6 children. Her husband, my grandfather, died at a young age from cancer.  Alice became a single mother. As you can imagine, she didn’t put up with a lot of crap.

A group of us, my cousins and myself, can remember a time when we disobeyed Alice. Alice lived in front of railroad tracks, and for perfectly good reasons, we were not allowed on them. Don’t ask me whose big idea it was to go play on those tracks. I quit trying to figure out who is the bad influence, amongst my generation, a long time ago. Of course, we thought we were so smart and would not get caught. Ha.

All any of us remember is seeing Alice stomp down those tracks with a fly swatter in her hand. We should have run. We should have begged for forgiveness. But instead we froze. She swatted us all. I don’t remember if it really hurt us. What I do remember is how bad I felt that Alice was so mad at me.

Alice’s house always smelled like coffee, that she made in a percolator, and fresh baked bread. She always made Parkerhouse rolls, applesauce and coleslaw, at every Sunday meal.

Alice made a lot of depression era meals. I wish she was still alive so I could talk to her about those days. I love to talk to my 82 year old mother-in- law about the depression. She has so many amazing recipes that I’m excited to share with you, when I get the chance.

Today, I’m making a recipe that Alice made at many Sunday dinners, Homemade Beef Tips and Noodles. Alice made her beef in a pressure cooker. I’m using my Dutch oven. If you don’t have either of these, no big deal. Any pan with a lid, combined with a high heat in your oven, will give the same results.

kimg0432.jpg
Alice would be proud of that plate.


scans 022

My mom would also make this recipe. It’s a treasured recipe in my family. My mom and I are the only ones that continued the tradition.  However, everyone loves the meal. As a kid, I loved helping my mom make homemade noodles. My mom would make the noodles early and let them sit on the counter to dry. I use to eat them raw when my mom wasn’t looking, so I thought.


The noodles are crazy inexpensive. There are a couple different ways I make them. I use them with Beef Ragu and Alice’s traditional, gravy-style beef. I also use chicken and turkey, with the noodles, instead of beef. Those are both really tasty too. It’s also a really great way to use up leftover meats.

For the noodles you will need to whisk together 3 eggs with salt and pepper.

kimg0410.jpg
I love my giant fork.


Then, you need to add in 3 cups of all purpose flour, about a cup at a time, until a dough is formed. Knead the dough until all the flour is mixed in.


Dump the dough onto a well floured surface area. Cover and let rest ten minutes to soften the glutens. You will have a very hard time rolling these out if you don’t let them rest.

kimg0413.jpg
First attempt, about half way there.


I rolled but it was still hard to roll as thin as it needs to be. The noodles will swell when they cook, just like prepackaged noodles. So, thin is where you want to be.

kimg0414.jpg
Roll, flip, rest, repeat


kimg0415.jpg
Perfection


Now that your dough has been rolled thin, you want to roll it up into a jelly roll.


Then, with a serrated knife, cut the roll in slices. I like big thick slices but cut them however you like them.


After they are cut, you unroll the slices to make your noodles. You can cut them in desired lengths. Or you can do what I do. I rip them in smaller pieces as I unroll them.


Let the noodles sit on the counter all day, if you can, to let them harden up a little. This just ensures they cook without turning to mush and sticking together. I am sure I have had times that I didn’t have them sit long. Sometimes time is not on our side. On a meal like this, you want it to be a day you’re hanging out at home.

And kids love to help make these noodles. It is so much fun and think of the wonderful memories.

Now the beef. There are many ways to make a beef roast but I like to make anything in my dutch oven. It’s fast and makes any meat fall apart.

You’ll need about 2 pounds of beef. I like them very beefy. You could use one pound if you are on a budget. You could easily use less meat and double the noodles, if you are trying to save even more money.

Today I didn’t have much as far as vegetables and stock goes. I only had celery and carrots. So, I used a packet of onion soup to help with the flavoring.

Here is my typical recipe:
2 pounds beef chuck, round or sirloin roast

1 each of diced onion, carrot, celery, garlic clove

4 cups beef broth

1 tablespoon parsley

1/4 olive or vegetable oil

1/4 cup of flour

Salt and pepper to taste

Heat oven to 375 degrees.

Coat the roast in flour, on both sides, and salt and pepper to taste. Then sear the meat in a hot oven safe pan. Searing is critical for a very tender roast.


Remove the meat from the pan. Cook the vegetables, until golden brown, in the same pan and oils.

Once veggies are browned, add 4 cups of broth and stir and scrap the bottom to incorporate all ingredients well.

Add the meat back to the pan.

kimg0409.jpg
I burnt my veggies a little but it still tasted amazing. I tasted the burnt tidbits to ensure they weren’t going to ruin my meal.


Cover the pan and cook the meat until falling apart and easily shredded. This took me about 2 hours. The time will vary depending on your pan. My iron, dutch oven cooks very quickly because of the high temperatures that get trapped in a dutch oven.


When it’s done, you want to pull it from the pan and shred it with two forks. I keep mine in very big and chunky shreds.

Then, bring the juices to a boil, either on top the stove or in the oven. Once the juice is boiling, add the noodles.

kimg0427.jpg
In the hot pot they go.


Let the noodles cook for about 1/2 an hour.

kimg0428-e1517675064507.jpg
Swollen noodles.


Once the noodles are cooked, add the meat back to the pan, along with about 1/4 cup of milk or cream. The milk is optional but I really like the creaminess it gives. Cook everything for about 15 more minutes. Watch the pan closely because it will easily stick to the bottom and burn at this point.

kimg0429.jpg
All done.


Oh that smell. That smell takes me back to my childhood. If I could get one wish granted, I would wish to drink percolated coffee with Alice and my mom. But they are both gone. I’m so grateful for the things I learned from them both. Today, I felt a little nostalgia and a little sadness for my losses. However, it was a great reminder that it’s traditions like this, that keep our loved ones with us for many generations.

kimg0433.jpg
Parkerhouse rolls and peas to complete the meal.


Recipes

Not Chore Sandwich

I have a confession to make. I haven’t gone to the store in over a month. I have sent my husband to get milk and creamer but nothing else has been bought. I started my January like I always do, not wanting to spend money. Don’t we all get sick of all that shopping and dealing with people during the holidays? I know that I do. I love people, don’t get me wrong. I am as extroverted as they come. Even I have my limits, especially with all the holiday demands on my time, and more importantly, my cash flow.

So my resolution was to stay out of the stores and to use up what we have. I call this time, “Clean out the freezer month.” It involves more than just cleaning out the freezer. We have a pantry stacked full of food, as well. In fact, we have food all over our house after the holidays. Frozen leftovers. Cans of vegetables. Canned soups, salsas, green beans, fruits, butters, and pickled items from my garden. I have lots of baking goods from my mass cookie baking over the holidays. I always go overboard and buy too much stuff around the holidays.

Plus we own a granite business and people give us stuff. Lots of stuff. It’s this big push to give lots of stuff and get lots of stuff.

And you know what? I just love it!!


Just look at this food. This is after a month of not grocery shopping. I just feel guilty spending money on food when we have so much.

But here’s the catch. There’s always a catch isn’t there? It’s our busy day, basketball this evening. I usually make sandwiches of some sort because we don’t have time for a sit down dinner. We eat on the go tonight.

Today, I looked in my fridge and nothing. Nothing came to me. I didn’t feel like making bread and didn’t have any bread. I didn’t have any wraps, or chips. Nothing. I had a few vegetables that I cook with, like carrots and celery, cream cheese, salsa, corn tortillas, 2 yogurts, a couple dollops of sour cream, pickles (lots), eggs and some swiss cheese. A lot of items in my pantry too but nothing that a kid could easily eat on the run.

Then it hit me. Corn tortillas. Salsa. Cream Cheese. YES! We are having homemade nachos for dinner and they will be somewhat healthy. The tortillas are whole grain. My own salsa is organic and homegrown. The frying is the worst part but the best part.

So I went to work.

My cream cheese was cold, of course, so I had to soften it. I put the pint of salsa, one block of cream cheese, cut into smaller pieces, and those few dollops of sour cream. I microwaved the mixture for about 3 minutes total, but in 30 second intervals.

KIMG0378.jpg
A little chunky still

KIMG0379.jpg
Perfect. Cream cheese lumps are gone.

It was a little bland for our liking. We like flavorful food around here. So I started digging through my spices and came across a packet of seasoning that is used to make dips. It was perfect. If you don’t have that, you could use taco seasoning and that would be really good. That was my first idea. Just a couple of tablespoons. You could also add chili powder, garlic and onion powder, cumin, coriander, paprika, be creative.

KIMG0388.jpg

If you don’t have salsa, look around, you might have other ingredients that are salsa-ish. For example, canned tomatoes, dehydrated onions and garlic, and cumin, would give this a really nice flavor as well.

KIMG0381.jpg
Put it in containers and into the fridge

So for the chips. I love to fry. So many people are afraid to fry things. I know this because that use to be me. Once you figure out how things work, frying is super easy. I prefer to fry in peanut oil but it’s too expensive for my budget. So, good ole canola oil is what I use.

I know this seems like a lot of work, but these chips cook extremely fast. Also, remember, the other half of this dinner was made in the microwave in a matter of minutes. If you really don’t want to fry, skip this part and buy some whole grain chips instead.

Frugally speaking, you are much better off buying the tortillas and frying them yourself. So much cheaper. I had these for another meal I made a week ago, Tako No Mo, Asian Chicken Tacos. As we know, I am not one to waste.

tortillas
30 of these for less than a dollar at Aldi.

You know what else is yummy with this dip?

KIMG0382.jpg
Everyone has carrots in the fridge

Make sure you use a deep pan if you are frying on your stove top, like I am today. I love to use my iron skillet/dutch oven for frying. It gives the best heat, that is even and easy to maintain. This is not a requirement though. Any deep pan will work.

KIMG0397.jpg

Now a few tips on saving money with frying. Don’t throw that oil away when you are done. The only time I do that is if I am frying fish or seafood of some sorts.  I don’t know if you even need to do it for that but I do. Reusing your oil does not only save you money, but also, used oil is easier to fry with. It has already been heated to extreme heats and therefore has the coloring of cooked oil. What does that mean for you? Browning. It adds the perfect color and texture to your fried foods.

KIMG0391.jpg
My used oil stash

You want to get your oil very hot. If you don’t, whatever you are frying will be logged down with grease. Have you ever eaten at a restaurant and your fried food was covered in grease and disgusting? That is because they are not frying in oil that is hot enough.

While your oil is heating, you can use this time to cut the tortillas in the desired pieces.  This is also a good time to prepare your draining surface. I used a cookie sheet and paper towels. I use a slotted spoon to scoop up my fried chips.

You will need to cut slits in the tortillas, prior to frying, to help with the puffing up. I cut them all at once, while I have them stacked together. Just run a sharp knife through the whole stack.

KIMG0401.jpg
Slit it to prevent too much puffing


When you think the oil is hot enough, try one chip as a tester chip. If it immediately bubbles up and floats to the top, you are good to go.

If you are a beginner, just fry a couple chips at a time so you are not overwhelmed.

I made a video of my fried chips so you can see how quickly they are done.


When the chips are draining, you want to add some salt to taste.  When they are cooled enough to touch, they are ready to eat. At first, the chips will be soft but will harden as they cool. If you have any helpers, this is a good time to round them up. They can be salting while you are frying and taking the chips out of the fryer.

KIMG0403.jpg

For fun, I put the chips in small brown lunch bags. I cut the top off to make it easier to get his hands into.

KIMG0405.jpg
Cute Little Bag of Chips

I packed it all up with those yogurts, a drink and some canned pineapple chunks. My little guy really enjoyed this meal. Eating can be fun and frugal at the same time. And I got to be creative and avoid the store. It’s a win for everyone today.

KIMG0404.jpg
Lots of fruit and veggies, protein and whole grains. My little guy is set for a meal.